


Can you tell I'm on a roll right with spray-paint? Give me a can of Krylon and I'll paint ANYTHING!!
I inherited this oldie, but goodie sewing box from my Grandma Adams. It's sentimental to me...she wasn't a seamstress, really, but it held the needles and thread she used to hem Grandpa's pants, along with the materials she used to make yo-yo circles for her homemade clown dolls for her grandchildren and great-grandchildren.

Now that I have a dedicated sewing/craft desk (thanks, Honey!), this lovely leaf-motive box has been sitting out on display - However, it's not really my style. I knew I could give it new life, so figured out how to dismantle it and make it "mine"!

Stuff you need:
- screwdriver/putty knife you can wedge between the trim & the box
- needle-nose pliers
- primer
- spray paint
- your choice of new fabric
- staple gun
- hammer
- scissors
Instructions:
Step #1: Check to see how your sewing box was assembled.
Step #2: Mine had staples holding the material together, so I used a putty knife/screwdriver to wedge between the trim and the box.

Wedging the putty knife in there should loosen the staples a bit, so you can then remove the staples by grabbing them with your needle-nose pliers:

Continue with your putty knife and pliers all around the perimeter of the box, until the trim is completely off. You can throw away the staples you removed, but keep the piece of trim!

This is what it will look like: (I removed the small piece of velcro after I took this picture - I decided that I didn't need velcro on the final project)

Step #3: Take outside and spray paint with 1 coat of primer. When that dries, spray paint a 2nd coat. Don't worry about getting paint on the fabric...you'll cover that up anyways! Let primer dry completely.

Step #4: Using your choice of spray paint, (I used Navy Blue Gloss from Krylon), spray the sewing box with a light coat of paint. Let dry, then spray a 2nd coat (and 3rd, if needed). Let dry completely ~ 2 hours, depending on the humidity. It's typically humid here in NC, so I let it dry overnight.


Step #5: Cut a piece of fabric for the top of the sewing box. Mine is a simple cotton fabric remnant from another project. Make sure it hangs over the edge of the sewing box lid by about 1 inch on all sides.

Step #6: Using your staple gun, staple your fabric along the sides of the box lid, pulling the sides taut as you go. My staples didn't go all the way in, so I used a hammer to make sure they laid flush against the lid:

Here's how it should look after you staple it. Using scissors, trim any excess fabric on the sides of the lid.

Step #7: Re-align your trim piece along the sides of the lid, and use your staple gun to re-staple it to the lid. Again, use a hammer to make sure the staples are in as far as they'll go (and you can't see them). If you can still see the staples, you could dab a bit of matching-color paint to mask them, or use a colored sharpie marker in the same color as your trim. OR, you could try to hot-glue the trim back on...didn't think of that until just now :)

Step #8: You're done!! Enjoy your updated sewing box!!
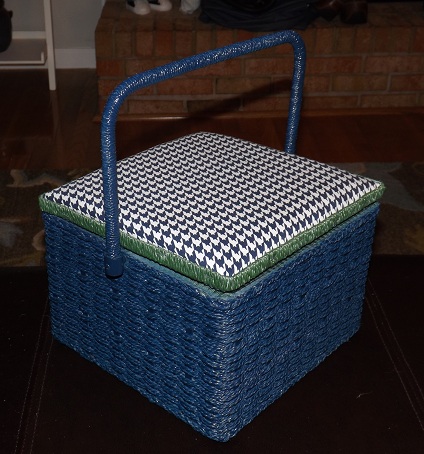
Quite a difference, don't you think?!


No comments:
Post a Comment