About Me

My photo
Welcome to Biddle Bits! My name is Sarah & I believe that *anyone* can create amazing things, if you just work on them one step at a time.
Powered by Blogger.

Sunday, September 23, 2012

Fondant cupcake toppers


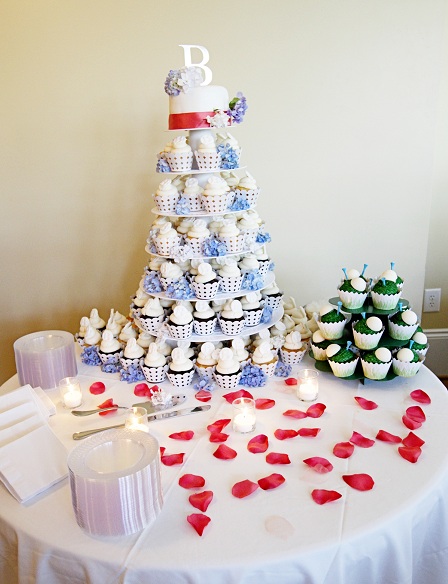
When my husband and I were married in June 2011, we (well...*I*) waffled back and forth between a traditional wedding cake and a cupcake-wedding cake. In the end, we liked the single-serving idea and knew that we could put our "spin" on each cupcake to make them personal. Plus, they were practical - having cupcakes meant we didn't have a cake-cutting fee, we didn't need to buy/rent forks, and didn't need someone to hand out cake. We ordered both white and chocolate cupcakes from a local bakery, topped with luscious white buttercream frosting. (and our dear friend ended up giving them to us as a [very generous] wedding gift!!)


After what seemed like months of searching for topper ideas, I found a magazine picture of a small fondant coin with the letter "M" stamped into it. I tore it out of the magazine and knew immediately I wanted to re-create it for our wedding!

I have used Rycraft cookie stamps before, and saw they had a monogram cookie stamp. I bought it online with the hopes it would be *just* what I was looking for...and it was!


Here's how's I (easily!) made monogrammed "B" fondant cupcake toppers for our wedding:

Ingredients:

Step #1: Dust your working space (countertop is just fine!) with Cornstarch. Using my rolling pin, I rolled out 1/3 of the bag of pre-made fondant, to approx. 1/4" thick.It helps to knead the fondant to soften it a little before rolling it out.

Step #2: I took the cookie stamp, and with medium pressure, stamped a "B" (my future married-last name) in the fondant. 

Step #3: Then, I used a smallish circle cookie cutter (the middle one of that set) to cut a circle around the letter. Use a thin spatula to move circle to a piece of parchment paper to begin drying.

Step #4: Before the circles are dry, use a small, new paintbrush to dust them with a small amount of shimmer dust. No water is necessary - just dust the dry shimmer dust directly on the fondant. I used the white shimmer, and it gave the monogram toppers a very elegant sheen.

Step #5: Let the fondant harden. I made around 150 of them, so put them in several parchment paper-lined cardboard shirt boxes and stacked them in my dining room for several days.

The day of the wedding, my bridesmaids and I pushed them into the wedding cupcakes as beautiful toppers!! I received SO many compliments on how beautiful they were...they were the perfect decoration to add that little something special! (and no one could believe they were homemade) :)

I made a small 6" cake for the top of the cupcake tower, so we'd have a cake to cut for us...Red Velvet cake with cream cheese frosting...YUM!! 


And, in the South, a Groom's cake is a fun wedding tradition - sometimes you'll see it at the rehearsal dinner, and sometimes at the actual wedding. My hubby is a golfer, so in keeping with the cupcake theme, I ordered some additional cupcakes, covered in hunter-green sugar, and topped them with homemade white chocolate golf balls, and personalized golf tees that I ordered online. The golf balls and tees were added the morning of the Wedding.


Notes:
* Photos courtesy of Nicole Faby Photography
** I made our fondant circles about 2 weeks before the wedding.
*** I would recommend that your guests remove the fondant before digging into the cupcake...it doesn't have any flavor, and since the fondant will have hardened, they'd be difficult to bite into!
**** Don't put them on the cupcakes any sooner than the day of your event. Any earlier and the grease from the buttercream frosting would break down the fondant - you'd be left with a gummy fondant mess!


These cupcake toppers could be equally as beautiful at a bridal shower, baby shower, 
or a birthday, anniversary, or engagement party.
Rycraft makes cookie stamps for ALL occasions, so the options are endless!

Wednesday, September 19, 2012

Homemade Peanut Butter


Part science project, part kitchen yumminess...

Homemade peanut butter!! (minus all those partially hydrogenated oils)


What you need:
  1. peanuts, cashews, almonds...choose your favorite nut :)
  2. A food processor
That's it!!


Step #1: Grab a couple handfuls of your favorite kind of peanuts (or cashews, or almonds), and throw into a food processor. I used Trader Joe's reduced salt, roasted peanuts.

Step #2: In the food processor, blend, blend, blend...keeping blending. The peanuts will go from a solid peanut, to chopped peanuts, to gritty peanuts...and not too much later, they will turn into a creamy peanut butter. Don't add anything else...just peanuts!! (scrape the sides of the bowl as you go, if needed) I read somewhere that as the peanuts are ground up, it releases the natural nut-oil, so you don't have to add any other oils or butter.

This is REALLY all you need!
The finished project...

It was really good! Very creamy...
Note: It's not as sweet as most of the peanut butter you buy in a typical grocery store, but I really liked it - and I love that it's a natural option for my PB&J sandwiches.


Step #3: Be sure to keep it refrigerated in a closed container.

Let me know what you think! What else do you make from scratch??


Friday, September 14, 2012

Easy art - made of greeting cards!


I don't know about you, but I have a really hard time finding art that I love.

I needed a little something for the space above my sewing table - the walls are a bright blue, so it's been difficult to find art that doesn't dull down the blue. So...the wheels in my head started turning: A couple of years ago, my Mom gave me a set of adorable owl notecards: 


The colors are bright and cheery, and there's a small amount of clear glitter/glimmer on each card...just enough to catch your attention! I've always thought they'd make cute art, if grouped together...and I just happened to have an empty 8.5x11" white frame laying around from my last trip to IKEA. So, "project mini-art" began...

I kept the rectangular white paper that came in the frame - then lined up the cards to fit all 4 of them in the rectangle. (The top and bottom cards are overlapping a bit, and I had to trim the bottom of the 2 lower cards to make them fit).

Then, I used double-sided table to affix them to the paper. 

Finally, I put the paper/arranged cards into the frame and reattached the frame backing. I used 3M picture hanging strips to hang it on the wall, so no holes in the wall to fix down the road. Gotta love that!

Voila - really cute, colorful art! hoot hoot!


While I'm loving the bright colors this brings to the room, I can totally envision it in a baby's room or playroom in the future. Maybe even baby shower gifts for my owl-loving friends :)

Please excuse the mess...
What homemade art have you made? Or, where do you buy your art?

Friday, September 7, 2012

A cute "thank you" for Recruit-MINT!


As I have mentioned before, I'm a proud Sorority Alumna - I am a Chi Omega! I'm actively involved in the National organization and was recently asked to help recruit local Alumnae volunteers for our NCSU ChiO Chapter's Recruitment (formerly known as "RUSH").

I wanted to say "thank you" to the women who are volunteering many hours of their weekend (this weekend) for Chi Omega, so I set my creative mind to work...I ran across some peppermint patties while shopping yesterday, and thought "how cute would it be to thank the Alumnae for helping with Recruit-MINT"!?

I bought 3 bags of the chocolate-covered goodies, took them home, (ate a few!) and put 3 peppermint patties, each, in little clear baggies. (I had some small ziploc-like bags left over from our wedding).


Then, I counted out the number of volunteers for each "shift", and put those baggies in a larger, clear cellophane bag (which I also had on-hand) - then, hand-wrote a little "thank you!" I tied everything up with Cardinal & Straw (red & yellow) ribbon, curled it with a pair of scissors...and voila! Here's the end product:


I'm so thankful to have wonderful Chi Omega Sisters to help NCSU with their Recruit-MINT!

Best wishes to the Alpha Kappa Chapter of ChiO this weekend and a warm welcome to all the new "baby hooties" next week!!

Tuesday, September 4, 2012

Turning a ceiling medallion into a wreath


While sifting through a thrift store near Southern Pines (about 1 hour south of Raleigh, NC), I ran across a small white ceiling medallion. A few months ago, I probably would have walked right by it, but after infusing Pinterest into my crafty brain, I knew it had potential! It was hanging on the wall, like a wreath, and I knew it had to be mine. For $2, it went home with me, where it promptly got a coat of Annie Sloan chalk paint in "French Linen". Thankfully my Sister-in-Law, Jacque (of thediyvillage.com) was in town and had a sample pot of chalk paint for me to try!

Small, white ceiling medallion - from Lowes.com
I laid some newspaper out on the table, and used a small paintbrush to cover the medallion with the paint. I just did one coat of paint, and it left a vintage feel to the "wreath". While I love how it turned out, if I were to do it again, I'd just spray paint it...there were lots of nooks and crannies, so it felt like it took FOREVER to cover with the small paintbrush.


Once it was dry, I tried hanging it on our front door...but it was way too small (this medallion is only about 12" in diameter), so it looked a little goofy. I tried hanging it from the mirror in our front hall, but given that the hubs and I are both tall, the wreath fell *right* over the reflection of our faces - kinda defeats the purpose of a mirror by the front door, don't you think? Then, it hit me...I had the perfect space!! A small wreath holder that's been hanging out in our downstairs bathroom since...(I'm ashamed to admit it)...we moved into this house over a year ago.


Ta da - It's the perfect size for that space!
*If you wanted to use this on your front door, or elsewhere outside, you'd need to spray it with some sort of polyurethane that's water-resistant/waterproof. Even then, I wouldn't recommend hanging it where it could get wet (where there isn't a roof or overhang of some kind...to protect it)

Can't you just see it with a thick red ribbon tied around it for the Holidays?!

Have you made a wreath with unconventional items? Tell me about it!!