About Me

My photo
Welcome to Biddle Bits! My name is Sarah & I believe that *anyone* can create amazing things, if you just work on them one step at a time.
Powered by Blogger.

Tuesday, July 31, 2012

Homemade laundry detergent


It's official: I've become obsessed with DIY-ANYTHING and EVERYTHING...including laundry detergent.

I pinned this recipe on Pinterest and gave it a try. I couldn't be happier with the results...and the cost-savings. From a personal standpoint, the hubs and I have been very happy with the homemade detergent - As an workout-aholic, I have lots of stinky gym clothes each week, and this recipe (even minus the optional oxy-clean) gets my clothes fresh and clean (and I wash most clothes using cold water). By the way, we have a high-efficiency washer - this detergent recipe is appropriate for an "he" washer.

This recipe is from the blog: "Being Creative (to keep my sanity)": 

According to her blog, this recipe lasted her 9 months, and only cost about $20 total for 9 months of laundry soap. I'd say that's pretty good! I haven't kept track of how long ours has lasted, but I can't remember when I made this...it was *that* long ago.


Picture credit: "Being Creative (to keep my sanity)"

Ingredients:
  • 1 4 lb 12 oz box Borax (2.15 kg or 76 oz) found in the detergent isle
  • 1 4 lb box Arm & Hammer Baking Soda (1.81 kg) found in the cooking aisle
  • 1 box Arm & Hammer Super Washing Soda 55 oz (3 lb 7 oz) found in the detergent isle
  • 3 bars of Fels-Naptha soap, found in the detergent isle 
  • Optional: 2 small containers of Oxy Clean or store brand Oxy Clean (try to get about 3.5 lbs total (1.58 kg)) found in the detergent isle. (if you have messy kids, the cleaner the better)
I don't want to take traffic away from her site, by posting her recipe *and* instructions on my blog, so check out her blog for the instructions: 


What DIY home-products have you made? Are you happy with their performance?

Friday, July 27, 2012

The BEST and EASIEST lemon cake cookies EVER!


mmm...

Sometimes I just feel the need to bake...know what I mean? There's something about it that's so comforting. A family favorite are these easy lemon cookies that my Mom first made a couple of years ago. I made 2 batches of them for a surprise party for Mike's Grandma, and they were gone in MINUTES. 

Last night, I was in the mood to bake, so I brought out the lemon cookie ingredients (I have them on-hand in case of emergency - ha!) and started the delicious recipe. Once they were done and cooled off, I decided immediately that they had to get OUT of our house! They're just too good, and I can't be trusted when cookies are involved. (When they were done, I taste-tested one  two three of them, (quality-control, right?!) then wrapped 'em up and put them in my car overnight to be taken to work. I should stress again...I can't be trusted)


Ingredients List:
  • Box of lemon cake mix
  • 1/2 cup vegetable oil (or canola...whatever you have on hand)
  • 2 eggs
  • 1 cup white chocolate chips
  • PAM spray
Instructions:
  • Step #1: Mix cake mix, oil, and eggs together. (by hand, or with a mixer)
  • Step #2: Add chocolate chips
  •  Step #3: Spray 8x8 pan, sprayed with PAM and pour in cookie dough mixture. Smush into the pan with a spatula.
  • Step #4: Bake at 350-degrees for about 18-19 minutes...or until the top is golden brown and a toothpick stuck in the middle comes out clean. Once it's cooled, the middle may "sink in" a little. That's ok!
  • Step #5: Cut into pieces and serve! YUM!

*To make cookies, instead of bars, take a small scoop/tablespoon and form dough balls on a prepared cookie sheet or parchment paper/silpat liner. Bake at 350-degrees for 7-10 minutes, or until the tops brown a smidge. The smaller the cookie, the shorter the baking time. Let cool on a cooling rack. 

Time yourself to see how long you can wait before you dig in!! How long could you wait?

I'd love to know...what's your favorite cookie or bar?

Wednesday, July 25, 2012

How to cut glass bottles using polish remover & a flame


I've seen a few posts on Pinterest, explaining how to cut glass using fingernail polish remover, cotton string, and a flame. I was curious to see if it *really* worked, and my hubby just happened to have saved some cobalt-blue beer bottles in the garage...just waiting to be used for a cool project :)

Here are 2 of the tutorials I looked through for instructions:
     -http://jaderbomb.com/2012/06/14/how-to-cut-glass/
     -http://366daysofpinterest.com/2012/04/03/day-63-diy-corona-glasses/

Everything but the sandpaper!
Items needed:
  • glass bottles
  • acetone nail polish remover (I haven't tried non-acetone, though I'd imagine it would work too)
  • cotton string (or yarn)
  • lighter
  • sandpaper (I used 100-grit, but any grit would probably work)


I will admit that my first try was a Pinterest FAIL. It's hard to tell in the picture below, but the glass did break, though it was a very jagged cut.

FAIL - jagged edge

My 2nd try worked like a charm!
SUCCESS!
Instructions:
(Safety first! My brother is a fireman, so I should begin by saying that you should keep a fire extinguisher nearby...just in case)
  • Step 1: rinse out beer bottles and fill up a sink with ice-cold water.
  • Step 2: cut enough string/yarn to wrap around the bottle at least twice. Knot the string tightly and cut off the extra string.
  • Step 3: remove the string from bottle and soak in nail polish remover - just long enough to saturate the string
There *is* polish remover in there
  • Step 4: Roll saturated string back over bottle, and position the string in as straight a line as you can. (Position the string at whatever height you like - I chose a tall position, so I can use the cut bottle as a vase)
  • Step 5: While holding the very top of the bottleneck, light the saturated string on fire. Use your other hand to hold the base of the bottle, so you're using both hands. Roll the bottle around in your hands, keeping the flame evenly distributed. Keep rolling until the flame burns out. (less than 1 minute)


Step 6: Immediately as the flame burns out, dip the glass into the sink of ice-cold water (still holding both sides). You should feel, and maybe hear, the glass break. It should break just above the string position.

  • Step #7: take sandpaper (I had 100-grit handy, so used that), and carefully sand the broken edge of the glass, taking care not to cut yourself. Sand until completely smooth.
  • Step #8: I had to use (a lot of) goo-gone to remove the stickiness left under the beer label
Not an *exact* straight line across the top, but pretty close!
VOILA! You have a beautiful cobalt-blue flower vase! 
If you sand the bottle neck, you can use it in your plants as a self-waterer!!


Gotta love a goofy husband - here he is, trying to, erm...find a few other creative uses for the bottleneck...

Has anyone else tried this glass-cutting technique with success?


Thursday, July 19, 2012

Easy update: Painting picture frames


I came across a framed owl picture in my living room the other day - I've had it for *years*, but I'd almost forgotten about it... the dated brown frame made it seem to disappear on the black hutch where it sits. I thought "it's time for an update!", so I got out my masking tape, opened a can of paint, and got to work.

Project list:
Old wooden frame
masking tape
primer (optional)
paint
foam paint brush
newspaper/old magazine to protect working surface

*If the picture and glass can be removed from your frame, remove it - it makes painting even easier! You can use spray paint in that instance.
Alas, the picture and glass could not be removed from mine, so here goes...

Step 1: wipe down your frame with a damp cloth and dry it completely.

Step 2: using masking tape, tape off the edges that touch the glass. (The masking tape will be *on* the glass)

Step 3: (optional) If you want the paint on your frame to be "durable", paint your wooden frame with primer first, then wait for it to dry before proceeding to the next step.My frame is going to sit on a shelf, and I was feeling lazy, so I didn't prime it. 

Step 4: using a foam paintbrush, or any paintbrush for that matter, paint the frame! (see, I told you this was easy). Wait to dry before adding a second coat of paint. I didn't worry about brush marks - it's hard to see in this photo, but the slight brush marks give it that broken-in look that I was going for.


Step 5: Peel the masking tape off the glass once the paint has been drying for about 5-10 minutes. If there's any dried paint on the glass, you can scrape it off with a fingernail or knife.

Step 6: Let dry for a full 24-hours before putting on a shelf, or hanging on a wall.
Step 7: Stand back and enjoy your newly updated frame!

I love how a little paint takes this piece from the 1980's to 2012! 
It looks really fresh to me, and I actually *notice* the picture now.


Quite a difference, don't you think?
Have you painted any random items around your house lately?

Wednesday, July 18, 2012

Fruit Pizza Recipe


Fruit Pizza!!

When birthdays roll around each year, I’d rather say “yes, please” to a piece (or 2!) of fruit pizza, than to birthday cake and ice cream J. It’s a family-favorite: super-delicious and super-easy. (I wish it was super-calorie friendly…but hey, I have it once/twice a year, so no worries!)

Last Sunday, we celebrated 3 of the 4 family birthdays in July (5 if you count Uno Robusto's b-day), so I made a fruit pizza, complete with birthday candles.

Here are the step by step instructions on how to make this delicious dessert:

Ingredients:

·    Bag/box of sugar cookie mix
·    Ingredients needed to make the sugar cookie dough (listed on box - typically a stick of butter and 1 egg)
·    (1) block of cream cheese or 1/3 less-fat cream cheese
·    1/2 cup sugar
·    1 tsp vanilla
·    choice of 5 fruits

Step 1:     Make sugar cookie dough, according to bag/box directions. 

Step 2:     Press into a large circle, on a pizza pan sprayed with PAM. (if dough sticks to your hands, dip them in a small amount of water - it will help the dough release from your hands while you're pressing it into the circle). 

Step 3:     Bake at 350-degrees for 12-ish minutes. Keep an eye on it, as when it's evenly light-brown on top, it's done! Let cool.

Step 4:     Meanwhile, mix cream cheese, sugar, and vanilla with an electric mixer. Spread mixture onto cooled "pizza crust". 

Step 5:     Arrange cut fruits on top in whatever design you'd like!

Step 6:     Keep in the fridge until you're ready to serve. Cut into 8 pieces and enjoy!

*Here's a handy tip: take a pineapple ring and stick it right in the middle of the pizza...then place fruits around the pineapple until you reach the very edges.

Suggested fruits:
  • pineapple ring
  • canned mandarin orange slices
  • grapes, halved
  • strawberries, sliced
  • blueberries
  • blackberries
  • raspberries
  • kiwi, sliced
  • pitted cherry (for the very middle)
*If you make this ahead-of-time, wait to put the cream-cheese mixture and fruit on the crust until 2-3 hours before you serve it. Otherwise, the crust can get mushy.

What is your favorite birthday cake or celebration recipe?


How to make a padded camera strap cover


My sweet husband gave me a really cool camera for my birthday, and being the girly-girly I am, I felt the need to immediately make a fun camera strap cover for it.
my cool camera, sans cool camera strap cover :)

I went to JoAnn Fabric with a handy 40%-off coupon and scrounged through their wall of fabric until I found one that called my name. (My first fabric choice was white with pink polka dots, but I figured Mike wouldn't love using the camera with such feminine flair.)

I love the fabric I picked out - it's a little bohemian - mainly navy blue, with flowers and medallions in oranges, yellows, greens, and light purples. It's a lightweight cotton fabric, and I bought 1/4 yard (though ended up using a little less than half of it). The interfacing gives the final product a nice padding.

Project List:
1/8 yard of lightweight cotton fabric
1/8 yard of fusible fleece interfacing
coordinating thread
sewing machine
scissors or rolling-cutting knife (like a pizza cutter, but for fabric) :)
iron

I didn't have a pattern to make this...I just played around until I figured out what worked best. You may want to read through this whole tutorial before starting, so you'll have a better understanding of what's going on early in the process.

Step 1: wash and dry your fabric, then iron it and cut any rogue strings off the edges:

Step 2: measure the strap that came with your camera - mine was exactly 1-inch wide, and 22-inches long, so I cut my fabric into an approximate 4"x23" rectangle. Then cut the fusible fleece interfacing a smidge smaller (maybe 3.75"x22.75").

Step 3: lay your fabric face-down on a flat surface, and lay the interfacing on the wrong-side of the fabric ("glue" side of the interfacing touching the wrong-side of the fabric). You'll see in the picture on the right that the fabric is a little larger than the interfacing - this is correct :)

Step 4: iron the interfacing to the wrong side of the fabric. The heat from the iron "glues" the interfacing and fabric together. The fusible fleece interfacing should come with directions on how hot to set your iron.  

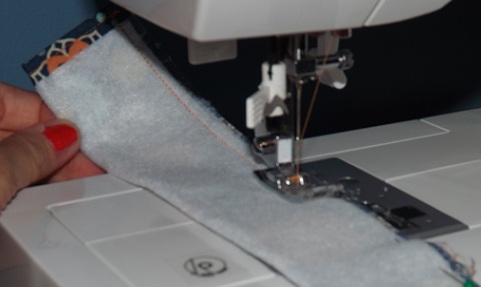
Step 5: Fold the short-edges over a smidge, iron them (makes it easier to sew) and then sew along the short edges with a 1/4" seam allowance. This will keep the folded edge under and make a nice finished edge.

Step 6: fold the fabric rectangle in half, length-wise, and pin along the long-edge. Then sew along the long-edge with a 1/2" seam allowance, creating a long-tube, leaving both ends open.

I chose to cut some of the extra fabric away from the long-edge with pinking shears, which will keep it from fraying and make it less bulky, and therefore easier to turn inside out.

Step 7: I don't have a picture of this, but now it's time to turn this tube inside-out. I suggest pinning a large safety pin to one end of the tube, and push it up into the middle of the tube. Keep working the safety pin up into the tube until it's complete inside out, and the right side of the fabric is on the outside. Remove the safety pin. Then flatten the tube so the seam runs right down the middle, and iron flat. (the seam will be on the inside of the strap, so will sit against the back of your neck when using your camera.

Step 8: slip the cover onto the current camera strap, and you're all done!!

Approximate cost for this project was less than $5 for the fabric and interfacing, since I already had coordinating thread!

What fabric projects have you made lately?