Pages

Wednesday, March 27, 2013

How to make a baby tag blanket


I am in the midst of decluttering and cleaning - to make room for Baby Biddle's nursery. Cleaning/decluttering aren't my favorite things to do, but I love how productive I feel when it's done!

While going through my craft stash, I ran across some material for what I call a baby tag blanket (or a "baby softie") - it's the super-soft, fuzzy material that usually has "nubbies" (a slightly raised polka dot pattern) all over it.

I also found some football ribbon that would be cute for a boy's softie blankie... Looks like I have everything I need for a quick sunday afternoon project (can you say distraction from cleaning/decluttering??):

What you need: 
  • fabric scraps - see my choice of sizing below, but it can be any size you want it to be!
  • ribbon scraps
  • straight pins
  • sewing machine
  • rotary cutter and board, or fabric shears

Step #1: I cut my fabric into 2 squares, approximately 10.5" x 12" each. I used a rotary cutter and a cutting board, but regular old fabric shears would do the trick as well. Cut your ribbon into 4.5-5.5" lengths. (I planned to put 2 ribbon "tags" on each of the 4 sides of the blanket, so I cut 8 lengths of ribbon)


Step #2: Lay your fabric right-sides together and make sure your edges line up. If they don't, give 'em a little trim. Pin around your edges.


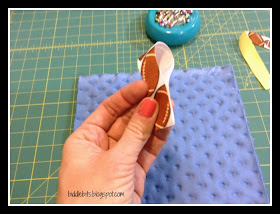
Step #3: Take one piece of ribbon and fold in half, with your pattern facing "up". This will be a ribbon "tag" on your blankie.


Step #4: Remove one of the pins from your blanket fabric, and pull one side of the fabric back - enough to lay a folded ribbon *inside* the 2 pieces of fabric:


Carefully lay the fabric back on top of the folded ribbon and pin in place. Make sure both edges of the ribbon line up with the fabric edge. You can't see the ribbon below, but see the arrow? The ribbon is folded and pinned between the 2 pieces of fabric there:


Step #5: Continue that ribbon folding and pinning all the way around the perimeter of the blanket fabric. I put 2 ribbon "tags" on each of the 4 sides of the blanket.


Step #6: Break out your sewing machine...I lined the edge of the fabric up with my sewing foot - it made for an easy sewing guide and straight lines. You'll want to start your sewing about halfway down the length of one of your edges, so that when you've sewn all the way around all 4 edges, you can leave a small opening on one side...to turn the blanket right-side out.


You can see here that I've sewn all 4 edges, and left a small opening at the very bottom of the blanket. I also used fabric shears to trim the 4 corners - it helps the corners to lay nicely when you turn the blanket right-side out:


Step #7: Pull the "inside" of the fabric through the small hole, and use a capped pen/chopstick/whatever you have handy, to push out your corners. I'd recommend ironing the edges at this point, so they line up nicely before you sew your finishing stitches. Be sure to fold under/tuck in the fabric where the opening is, and pin.


Step #8: Back to the sewing machine. Set your sewing machine to a zigzag stitch (or other decorative stitch - your preference). Starting at a corner, sew as close to the edge as possible, making a nice finished edge, and closing up the small opening. Back stitch at the beginning and end, for a secure finish!

VOILA! An adorable tag blanket for your Bebe...or a sweet homemade gift for a new Mom!

Friday, March 22, 2013

Vera Bradley Baby + 20% off at Tiny Prints

 
Mr. Biddlebits and I are excited to announce...we're expecting a BABY!
 
A "Biddle Bit", if you will. We'll welcome Baby Biddle to the world in early August 2013. We can hardly wait to meet you, BB :)
 
The good news for you, our beloved readers, is that (now that the morning sickness is over) we're head-over-heels gaga for DIY baby projects, so stay tuned for lots of fun nursery/baby-stuff related posts, along with our day to day projects tossed in for some balance :)
 
In the meantime, you've got to check this out...the new Vera Bradley Collection from Tiny Prints. I recently saw that Vera Bradley has a new stationary collection with Tiny Prints - including baby shower invitations, thank you notes, return address labels, etc. How pretty are they??

Vera Bradley Collection from Tiny Prints

You know Vera Bradley for their colorful bags, totes, luggage and more. My friends know them well for their dazzling colors, playful patterns and stylish designs. They have some of the prettiest and eye-catching patterns...(and bags that could easily double as a diaper-bag for moi and BB!!)

Check out some of the gorgeous stationary designs below:
Patterned Charm Baby Shower InvitationsFlowery Introduction Birth AnnouncementsSimply Precious Thank You Notes
They have lots of Vera Bradley designs to choose from for baby shower invitations, birth announcements, thank you cards, and address labels.
 
Plus, if you order by Tuesday, March 26, you can get 20% off your entire purchase at Tiny Prints. Just use the code 20MARSW by 11:59pm PT on Tuesday to save 20%.

Check out their
entire collection and make your stationery as dazzling as your bags.
 
*I was not compensated for this post, though there is a chance I could win a VB bag for blogging about their new stationary line. All opinions are my own. I just happen to love Vera Bradley patterns and products, and think you will too!

Tuesday, March 19, 2013

How to stencil a burlap pillow


Mr. Biddlebits and I were married on June 4, 2011 - we had lovely homemade burlap table runners for our indoor/outdoor reception, so after our Wedding,we had some a boat-load of leftover burlap material that screamed for a DIY project.


Initially, I wrapped some of the burlap around an existing pillow and hot glued the back to keep everything tidy. That was an extreme FAIL - it looked AWFUL from the back...the absolutely antithesis of "tidy"! But, I created a stencil of our wedding date, using microsoft word and our home printer, found a font that I liked, and resized it (in MS Word) until it was the size I wanted. Then, I cut out the "middle" of the numbers, leaving me with a stencil. (albeit it, a rough stencil - but it worked!) I centered, then taped the paper stencil to the pillow, then used a sharpie marker to fill in the date.

The pillow looked awesome...from a distance...until you picked it up and turned it over. However, I kept it tucked carefully on our rarely-used living room couch until this last weekend.

...when I decided it was TIME to do right by this poor DIY project!

Step #1: I created a new burlap pillow cover (leave me a comment if you'd like instructions on how to do that)

Step #2: ...stuffed the (de-burlaped/hot glued) pillow inside

Step #3: ...and created a new stencil using our Silhouette cutter and vinyl-sticker. For those of you with a silhouette, or similar cutter, I set my font size to 600, and I believe I used the Times New Roman font. If you don't have a silhouette, you can use the Microsoft word version I mentioned above. It works JUST as well!

Step #4: I centered, then stuck the vinyl stencil to the burlap, grabbed my sharpie pen, and colored in the numbers.


The final project is something I'm proud of! It's a simple pillow, but personalized for the Hubs and me - reminding us of one of the best days of our lives...6.4.2011!


Care to share other pillow/stencil ideas?

Wednesday, March 6, 2013

St. Patrick's Day cookies


A family and fan-favorite are my lemon cake cookies. They are DEE-licious and super-easy. I've made a few other cookie varieties with cake mixes (chocolate cake mix with dark chocolate chips, strawberry cake mix with white chocolate chips) and all have been equally as yummy. So, when I ran across a box of Pillsbury Key Lime pie cake mix the other day, I HAD to buy a box and try it out!

I followed the exact directions for my lemon cake cookies, using white chocolate chips, and they turned out a lovely key lime green color...

Perfect for St. Patty's day!!

I made them into cookie bars, rather than individual cookies, for a mexican fiesta dinner, and they disappeared pretty quickly...I didn't even get a chance to snap a picture of them out-of-the-pan!

They are magically delicious :)

Follow these directions for fun St. Patrick's day cookies or cookie bars!
Num, num, num...

Try 'em and let me know what you and your favorite leprechauns think!