About Me

My photo
Welcome to Biddle Bits! My name is Sarah & I believe that *anyone* can create amazing things, if you just work on them one step at a time.
Powered by Blogger.

Monday, February 11, 2013

$2 Homemade Valentines picture frame


My hubby found this $1 unfinished wooden frame at Michaels a few weeks ago...he tossed it in our cart, saying "you could probably do something cool with this for your blog". Challenge accepted :)


What you need:
  • cheap wooden frame ($1 from Michaels)
  • chalkboard paint (bought at Lowes...already had on hand, so $0 for me)
  • colorful ribbon ($1 ribbon - it was technically Xmas ribbon, so was 80% off)
  • Tacky glue
  • optional: various colored chalk
Instructions:
Step #1: paint 2 coats of chalkboard paint over entire picture frame. Wait about 10-20 minutes between coats

Step #2: Once paint is completely dry, lay ribbon across frame in desired pattern and cut accordingly. Draw a light line of tacky glue along the back of the ribbon and press onto frame in desired pattern. Wrap ribbon around the back of the frame and make sure it's glued well. Let dry.

Step #3: Insert a romantic picture of you and your significant other :)


Step #4: (optional!) With the chalk, write a love note to your Valentine and leave the new frame on their bedside table on February 14th!

Happy Valentine's Day everyone!

Monday, February 4, 2013

Recipe for giant soft pretzel


Last week, a friend of mine hosted a girls' wine night and everyone brought a dip to share with the group. I found this Pillsbury recipe and LOVE soft pretzels...sounded easy enough, so I gave it a try. It was DELICIOUS!! We loved it so much, that I made it again last night for the super bowl. Needless to say...it's GONE!
 
Mine isn't as pretty as Pillsbury's picture, but YUMMY!

Ingredients:
  • 1 can (13.8) refrigerated classic pizza crust                             
  • 1 tbsp baking soda
  • 1 egg, beaten
  • coarse salt, as desired
  • pre-made jar of queso (I bought the Target brand) 
Instructions:
  1. Heat oven to 375°F. Spray large cooking sheet with cooking spray. Unroll dough; reroll into long rope, stretching carefully to about 55 inches long.
  2. To make pretzel shape, form dough into U shape. Twist ends together twice. Press down dough where dough overlaps in an X. Pick ends up and fold over so they rest over bottom on U shape, pressing ends to stick. Place pretzel on prepared cookie sheet. 
  3. In small microwavable bowl, heat 1/2 cup water uncovered on High about 30 seconds or until hot. Add baking soda; stir until dissolved. Brush pretzel with soda mixture. Let stand at room temperature 5 minutes. (I'm not 100% sure what the baking soda does...but I *think* it helps the dough rise...don't quote me on that) :)
  4. Brush pretzel with beaten egg; sprinkle with salt. Transfer to cookie sheet. Bake 18 to 20 minutes or until dark golden brown.
  5. Open jar of queso. Heat if desired, but room temperature was pretty tasty!
  6. Dip  your pretzel in the queso til your heart's content!
Makes 6 servings
                          
 
Try it and let me know what you think!

Sunday, February 3, 2013

DIY Earring Organizer

 
I needed to declutter the top of my dresser AND my jewelry box, so made this neat-o earring hanger to hang above my dresser. It was a super-easy project - wanna know how I did it? Read on...
 
  
What you need:
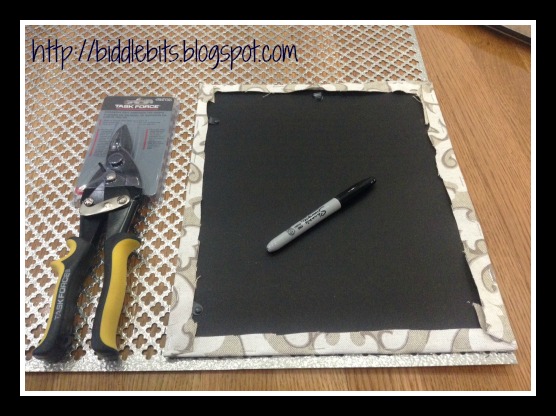
  • A sheet of stamped metal from your local Hardware store. I bought a large sheet from Lowes for about $25, and have plans for the rest of it!
  • 8"x10" (or larger) picture frame - with the glass and back removed. Mine came from Restore for $2 and got a coat of black spray paint.
  • Metal snips I bought them for $8 from Lowes. I'd recommend buying a pair with longish handles - makes it easier to cut the metal without the hurting your hands.
  • Hot glue gun
  • optional: ribbon - for hanging the frame on your wall
  • 

Instructions:

Step #1: Using a Sharpie marker, outline the backing of the picture frame onto the sheet metal. Put paper/cardboard underneath your work area, so you don't get sharpie marker on your surface. 

Step #2: Cut out the rectangle, using your metal snips
 

Step #3: Insert cut metal into the back of the picture frame. If it doesn't fit perfectly, trim the metal with your metal snips.

 
Step #4: Using your hot glue gun, run a straight line of hot-glue along the edges where the metal meets the wooden frame.
*Note: I originally tried a staple gun to staple the metal to the frame, but the staples were too long, and ended up coming through to the front of the frame.


Step #5: Turn the frame over, hang your favorite earrings, and you're DONE!
An optional step is to hot glue ribbon to the top-back corners of the frame, so you could hang it on a wall. Mine is leaning up against my wall, so no ribbon needed :)


There you go! Super easy and super-cute way to organize my favorite earrings.
ENJOY!


Tuesday, January 22, 2013

Glitter heart ornaments for Valentine's Day


While doing some post-Christmas shopping at Michaels, I ran across a bunch of these heart-shaped glass ornaments. They're technically Christmas, so were 80% off (!). I don't know about where you live, but every store in the Raleigh/Cary area were sold out of the round clear glass ornaments in the weeks leading up to Christmas. Apparently, there are a lot of Pinterest readers/contributors in the area :)
 

I followed the same instructions from my "Glitter on the Inside Ornament" tutorial from November of last year: http://biddlebits.blogspot.com/2012_11_01_archive.html

The only exception: I used pink glitter and white glitter (I don't recommend the white glitter...it didn't stick as well and looks more like snow inside the ornament than white glitter/glimmer).

Then, I cut a small branch from a backyard tree, trimmed the smaller branches and tossed them into a glass vase I had on-hand. Tie a festive (PINK!) bow around the neck of the vase and hang your adorable Valentine's ornaments on the branches!

 
VOILA! Adorable, easy and inexpensive decor for Valentine's Day!

Friday, December 28, 2012

Homemade Gardener's hand scrub


Hi everyone! I hope you had a magical hanukkah, Christmas, Winter Solstice, Kwanzaa, (did I cover my bases?)...and that you're looking forward to a fantastic 2013! Apologies for being absent for quite awhile - the holidays and associated travel (and planning) took me away from the blog for a few weeks. But, I'm back with lots of BiddleBits project ideas for the coming year!

Today's project was a holiday gift I've been wanting to make for awhile - and it would make an ideal Valentine's day or Mother's Day gift for friends, neighbors, you Mom, or teachers. It's a pretty light-pink color AND, it's easy-peasy.


Ingredients:
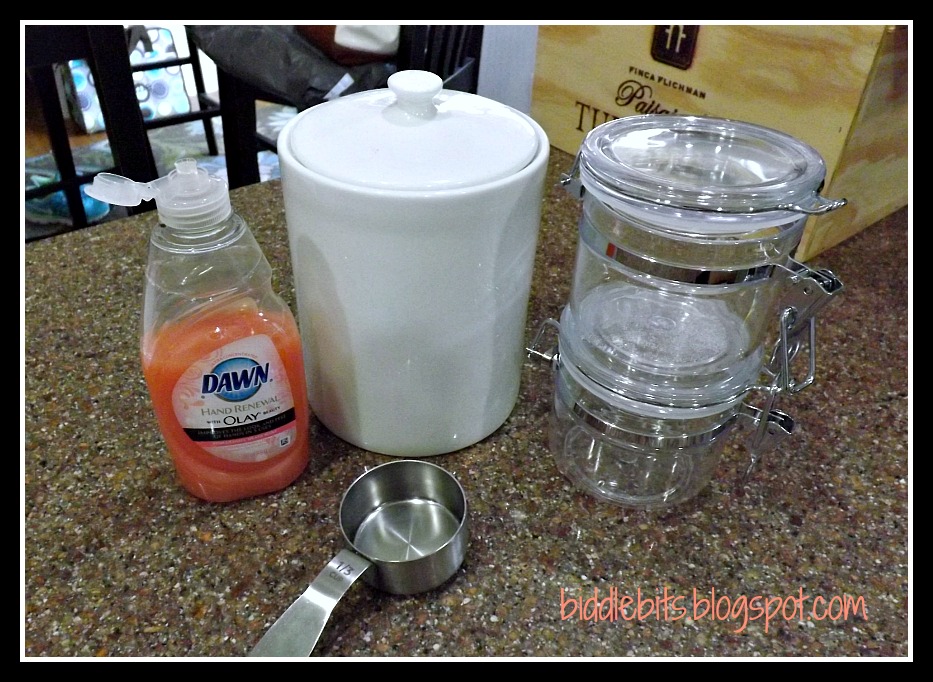
  • Dawn "hand-renewal" liquid dishwashing detergent
  • sugar
  • plastic or glass container with a tight-seal top
Instructions:

Step #1: Take each of your empty plastic/glass containers and fill them a little more than 3/4 of the way with sugar. Then, dump the sugar into a larger bowl.

Step #2: Add the liquid detergent to the bowl of sugar, a bit at a time, mixing with a spatula. The amount you use will depend on the amount of hand scrub you're making. Keep adding the liquid detergent until all the sugar is covered, mixed well, and is a little wetter than a paste.


Step #3: Using your spatula, spoon into your container and seal tightly
Step #4: Tie with an optional ribbon, if you'd like!
Step #5: (optional) You may want to include instructions:
  • Scoop a small handful into your hands, and rub all over your hands and between fingers
  • Rinse with water
Your hands will be super-soft, and if you've been gardening, the scrub is tough-enough to get the dirt from under your fingernails and from between your fingers!


Tuesday, December 4, 2012

Holiday decor using a recycled cabinet door


My sweet hubby went to the Raleigh Habitat for Humanity ReStore earlier this year, and brought home a trunk-load of various sized cabinet doors for $1-$2 each. I can't remember how we originally intended to use them (not as cabinet doors...), but as I was looking through our stash of wood scraps, an idea hit me. I could use one as a "large wood scrap" for a holiday sign I'd been wanting to make.

Sadly, I've *somehow* misplaced most of my "in-progress" pictures, so please forgive me as I describe the process, for the first time, with out many pictures!!

The previous owners of our home left several paint gallons in our garage - one color was Sherwin Williams "Poinsettia", which is about the reddest-red I've ever seen! It said "living room" on top of the never-opened lid, which means that I *think* they had intended to paint our living room Christmas red! (holy smokes...I'm glad they didn't...this paint is SO red!)

What you need for this project:
  • cabinet door
  • paint  - your color choice - I chose red
  • 1.5-2" paint brush
  • Small paintbrush - like the kind you did "paint-by-number" with as a child
  • white acrylic paint - or your color choice
  • black sharpie market
  • medium grit-sandpaper (optional - to give it a more rustic look)
  • polyurethane (optional)
How-to instructions:

Step #1: Take a wet washcloth and (in my case) clean the garage-grime off the door, then wipe it dry. Paint the whole cabinet face and edges with the red paint. Let it dry, then paint a second coat. Let dry.

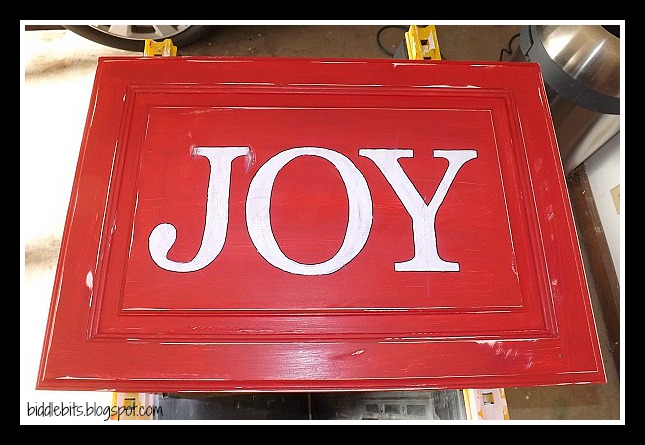
Step #2: While the paint is drying, decide what word you want to print on your sign. I chose "joy". In Microsoft Word, I typed JOY into a word doc (font = Cambria), then enlarged the font to 770. Each letter took up *most* of an 8.5x11" piece of paper. Print it out. (Note that if you're working with a smaller cabinet door, you'll need to adjust the size of your letters to make them fit).

Step #3: Using an Exacto knife (or scissors), cut out each letter.

Step #4: Make sure the red paint is dry, then lay your letters out on the cabinet door to make sure they fit. Making sure they're spaced evenly apart and centered, trace the letters onto the door using a pencil or pen.

Step #5: Using white acrylic paint and a small paint brush, begin outlining and filling in each letter, being careful to keep your edges as neat as possible. Let dry. Do a second coat of white paint. Let dry.

Step #6: Once the white paint is completely dry, take a black sharpie marker and outline your letters. This is optional, but gives a nice definition to your letters, and cleans up any not-so-perfect letters you may have.

Step #7: Taking medium-grit sandpaper (I used 120), rough up the edges of the cabinet door. I also chose to rough up the letters a little - to make it look more rustic and authentic. *Just be sure the paint is completely dry...otherwise the sandpaper will smudge the wet paint = not pretty. (I tried the orbital sander, as seen in the picture below - it was too powerful for the look I was going for, but if you want a *really* distressed look, try a similar sander!)

Using the orbital sander...

Roughing up the letters...

Look how rustic and charming it turned out!
 
Step #8: You may choose to spray a coat of polyurethane as a finishing touch, especially if you want to display this outdoors. We're only displaying ours indoors, so I skipped the poly.

Step #9: Put your beautiful work on display! I think ours will live above our mantel this Christmas season.


Who's ready to make one??

Tuesday, November 27, 2012

"Glitter on the inside" ornaments


These are definitely the most beautiful Christmas ornaments I've ever seen! (and that's saying a lot from this gal, who *LOVES* Christmas)
The lights on our Christmas tree reflect the glitter and glass gorgeously, and our tree sparkles from every angle.
 
These are easy as PIE - from start to finish, it probably took me 30 minutes
(excluding dry-time) ...and 10 of those minutes I fussed over the bows.
 
Here's what you need:
  • Liquid floor cleaner - I bought the cheapest I could find: $2.50 at Walmart
  • Assorted glitter - any colors you choose
  • glass ball ornaments - purchased at Michaels for just over $2 for 6 ornaments 
  • ribbon (optional - I bought mine at Walmart for 60% off after Xmas last year)
 
 
Step #1: Take the silver tops off of each glass ornament, and pour a small amount of floor cleaner into the ornament. Swirl it around, so the liquid cleaner covers every inch of the ornament's insides. Pour the remaining cleaner down the drain (or back into the original bottle).
 
Step #2: Pour glitter into the ornament and swirl around until evenly coated. It actually took quite a bit of glitter to cover inside! Then pour remaining glitter back out onto a paper towel to use for your next ornament.


Step #3: Set aside and let dry for a few hours.
 
Step #4: Replace silver caps and top with an optional ribbon bow. (I hot glued the ribbons to the silver ornament tops). With *or* without a bow, these are stunning ornaments! AND, the bonus is that there isn't a glittery mess when you're packing/unpacking your ornaments each year!
 

In my 2 favorite ornaments, I mixed gold and silver glitter ahead of time, then poured into the ornament and swirled around. It made this amazing platinum color! You can see them in the picture below...the 2 ornaments with the green bows. (The one in the back looks more gold, but you can see the truer platinum color in the front row, below):


What ornaments have you made this year? Care to share how you made them?