About Me

My photo
Welcome to Biddle Bits! My name is Sarah & I believe that *anyone* can create amazing things, if you just work on them one step at a time.
Powered by Blogger.

Friday, October 26, 2012

Plastic Spoon Flowers!


I am incredible surprised by this Pinterest project...what started out as a terrible, ugly mess of conjoined plastic spoons, turned into a beautiful work of art! When all's said and done, it looks like a flower made of glass.

Wanna try one at home? Here you go:

What you need for this project:
  • a box of plastic spoons, any color will work
  • candle
  • scissors
  • primer and spray paint - if you want to change the color of your flower afterwards!
  • a wee-bit of patience
Instructions:

Step #1: Carefully wave the plastic spoon over your flame. I went back and forth quite a few times until the edges start to roll in. Be careful!! Scorching hot plastic = trip to the burn unit if you're not careful!


Step #2: Cut off the handles - leave some of the handle on most of them, as (sorta) seen in the picture below. (you can always cut away more if you want to!). You should wear goggles for this part because spoon handles/plastic shards were flying all over our kitchen. Our cat had a hay-day. (Side note: do cat goggles exist? Eh, he wouldn't stand to wear 'em anyways). Anyhoo...


Step #3: Wash the soot off of the spoons - you'll need to rub 'em a little with your fingers. It doesn't all come off, which is ok b/c the variation in color looks neat on the final-product!

Step #4: Carefully, hold the newly cut, shorter spoon handles over your flame until the "rough" edge gets melty (or catches on fire), and then smush the handles together in groups of three. Hold it with your fingers or a clothespin until the plastic has cooled and set. You'll have to do this one spoon at a time. Be patient, you're forming the base of your flower. This was a little tricky step, so it just takes some practice. Then repeat with each bundle - hold the bundle of spoon handles over your flame until it gets melty (catching on fire is actually beneficial to get sufficient "glue"!) and then smush the handles together to form the entire base of your flower. Hold until cooled and set. Just be careful of the hot, melty plastic, please!


Step #5: At this point in the project, I thought this might be a Pinterest FAIL. In fact, I didn't take a picture of it, because I thought I'd just throw it away! Something told me to keep going...

Now, one-by-one, with the remaining  individual spoons with the shortest handles, or no handles, hold their ends over the flame (catch on fire, then blow out for best adhesion) and carefully fill in some of the empty spaces *on top* of the base, shoving the melty edges into whatever "crevices" need filling/look good! Keep building on top of the base, and fill in the empty spaces until you're left with this beauty!

 
Step #6: optional step, which I haven't tried: I saw a beautiful picture of a plastic-spoon flower, primed with spray primer, then painted with red spray paint, then somehow adhered to a front door-Christmas wreath. I'm not really sure how they adhered it, but I'd imagine lots of hot glue was involved :)
 
This beautiful flower cost me $1.49 - the cost of a box of plastic spoons at Target :)
AND, I have about half-the box of spoons leftover!
Has anyone else attempted to make these? Any helpful tips that I left out?


Tuesday, October 23, 2012

How to hem your jeans like a pro!


While perusing Pinterest last night, I came across a blogger who explains how to hem jeans, keeping the original "edge" of the hem in-tact. Apparently, the same way that alternations to denim are done at Buckle. I was skeptical, but excited to try.

Now, I'm pretty tall, (5'10") so finding jeans that are long *enough* is the usual problem. However, I have one pair of GAP boot cut jeans that are freakishly long...and considering I'm not really a stiletto-heel-wearing-type-of-gal, I figured they were the perfect pair for this little experiment!

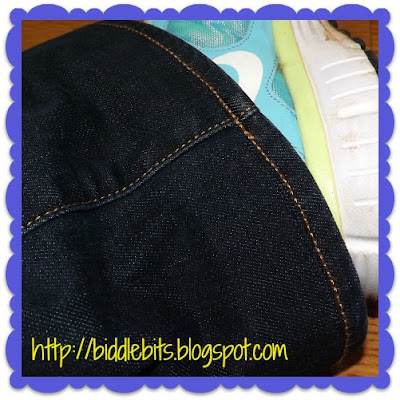
First of all, I am AMAZED at how great they look...you honestly can't tell where I hemmed them!! Can you see the line?? Nope? Me neither...

Check out the tutorial here - I followed her directions to a "T", except for these edits:

  • I didn't cut off the excess in the hem (yet...I want to wash them a few times to see if the length shrinks up at all...Nothing's worse than a "flood's coming!" pair of jeans! well...there are worse things, but you get what I'm sayin'...)
  • Once I turned the newly hemmed pants right-side out, I ironed the bottoms of the jeans. Just above the new, barely visible sewing line, I sewed a straight topstitch (the same color as the denim) all the way around the jean's leg. This will keep the bottom of the jeans from rolling up. The color should match so perfectly, you won't be able to see this topstitch...not even up CLOSE!


  •  
     
    Try it and let me know what you think!!!
     

    Sunday, October 21, 2012

    DIY polka-dot flower pots


    My Mom and I went to the Southern Women's Show in Raleigh earlier this year. It turns out that neither of us were too impressed by the booths and vendors there this year, BUT, I did see one cute idea that I've been wanting to recreate - one of the vendors was displaying her work in pebble-filled polka-dot flower pots. Of all the things we saw that day, those flower pots were, by far, the cutest!

    I was in Walmart about a week later, and found simple black plastic flower pots, so I brought 2 of them home with me. My brother and sister-in-law have a vinyl-cutter, so I put in a request for white vinyl-sticker polka dots of varying sizes: 1", 1.5", and 2" in diameter. They brought them during their last visit to NC, and I got right to work in polka-dotting those plastic pots! (If you don't have a vinyl-cutter, and don't know someone who does, you could search for "vinyl polka dots" on etsy.com or elsewhere and easily find someone to make them for you)

    Stuff you need for this project:
    • plastic pot(s)
    • vinyl stickers
    Instructions: (um, this is so easy, detailed steps aren't even really needed here!...but here goes - let me know if you have questions about attaching the vinyl stickers):

    Step #1: Determine how you want to layout your polka dots on the pot.

     
    Step #2: Peel backing from vinyl sticker, and stick on the plastic flower pot. Use a credit card or something similar to rub over the sticker - to make sure it's sticking to the pot.

    This is one of the dots, placed on the flower pot - the white translucent square over it is the "top sheet".
     
    Step #3: Pull the top-sheet off the sticker slowly, making sure it's sticking to the pot. (if it's not sticking, press it back down and go over it a few more times with the credit card.

    Step #4: Repeat Steps 1-3 as many times as needed, to get the look you're going for!


    Until I get around to replanting our pansies in these pots, they're being used as a Halloween candy holder, near our front door!! Pretty cute, huh?


    I think this same idea could be SO cute, using a red flower pot with green and/or white dots, or a green flower pot with red and/or white dots at Christmas! You could fill them with Holiday goodies for your neighbors, or leave it under your Christmas Tree with treats for Santa! ;)

    Sunday, October 14, 2012

    Southern Bloggers Conference - My Fall placesetting


    I had the pleasure of attending the inaugural Southern Bloggers Conference in Raleigh this weekend. I learned so much, got some great ideas, and met lots of new friends and well-respected bloggers. (Not to mention I got to hang out with Jacque and Matt Knowlton from the DIY Village all weekend (who just happen to be my brother and sister-in-law!).

    This was my first bloggers' conference, so before i got there I didn't know what to expect, and was feeling very much like a newbie and a little unconfident about my blog! There was a fall decor contest on Friday night, so I entered the contest with the expectation to "only do it for fun"...the attendees (around 100 bloggers) voted for their favorites in each category (fall wreaths, centerpieces, place settings, fall decor...I know I'm leaving one out!), and my placesetting won that category!! I was thrilled!!

    It turns out that, for someone who's relatively new to blogging, I'm doing pretty well so far and have some smart, creative ideas, so I left the event with a renewed confidence, new information, and excitement of what's to come :-). I guess I need to have a little more faith in myself...

    While there's no step-by-step for my *winning* placesetting, I wanted to share where I bought everything, so as to maybe inspire ya'll for autumn get-togethers or Thanksgiving dinner. Most of the items came from discount stores like Target, the Christmas Tree Shops, and Dollar Tree - some items we already had on-hand, and others are expensive brands (i.e.: Vietri) that we either received as wedding gifts, or I bought at the annual Vietri warehouse sale, deeply discounted, at the Vietri outlet nearby. I'm a bargain hunter, so there's no way I could pay retail price for Vietri!


    Placemat: I sewed it together, with 3 pieces of brown patterned fabric I had on-hand & orange bias tape from JoAnn Fabric
    Dinner plate: Portmeirion Sophie Conran (our everyday plates)
    Orange paper leaf: Target, sold in a pack in the dollar section
    Owl silverware holder: Cracker Barrel Old Country store
    Mini-pumpkin: Trader Joe's for 69-cents :)


    Salad plate: Vietri "Pineta-Acorn Brown"
    Cloth napkin: Christmas Tree Shops
    GobletPier1 Imports
    Pumpkin drink swizzle stick: Target
    Paper leaf, tied around base of goblet: Target, sold in a pack of 8 (?) in the dollar section
    Orange sheer ribbon: Dollar Tree


     Pumpkin shaped placecard holder: Christmas Tree Shops


    Do you decorate for fall? If so, what do you do? Know of any other good bargain stores you care to share?!


    Friday, October 12, 2012

    Halloween cookie-stamp Shortbread Cookies


    These dee-lish shortbread cookies are a family favorite - so good, in fact, that we made them as our wedding favors! (erm...not the pumpkin and owl ones...the ones with a "B"...for "Biddle" on them). They are super-tasty and super-easy!

    I'm headed to the Southern Bloggers Conference this afternoon, so baked up a Halloween bunch to share with my new blogger-friends! I hope you love these as much as our families do...

    Ingredients:
    • cookie stamps (mine are terracotta ones from Rycraft)
    • mixer (stand mixer is best, since the dough gets tough to mix, but a hand mixer also works)
    • 1.5 cups butter, softened 
    • 3/4 cup sugar
    • 4 cups flour
    • gift bags (*if* you're giving them away!)


    Step #1: Cream butter and sugar thoroughly. *important because the dough can flake off when stamping if not creamed well.


    Yes, yes..."Keep Calm and Bake On"...


    Step #2: Add flour gradually, one cup at a time. Mix this until well blended. It will look something like this:


     Step #3: Roll into 1-inch balls, and place on an un-greased cookie sheet.
    When you get towards the bottom of the dough bowl, you may notice the dough is more crumbly. Not a problem - just take some into your hands and roll it around a bit - the warmth from your hands will soften the butter and smooth out the crumbliness.


     Step #4: Stamp with cookie stamp. (Spray the cookie stamp with non-stick spray (like PAM)). Press down until the dough is about the same width as the stamp. If it doesn't turn out "right", just roll it back into a ball and try again! No worries.


    Step #5: Bake at 350-degrees (F) for 17-18 minutes.
    I didn't bake them this close together...I just put them all together for picture-sake. Space them out as in the pictures above. Since they're shortbread, they don't really rise, or get wider, which is good when you're trying to stamp a design on a cookie. Typical sugar cookies *probably* wouldn't work because they'd rise, and the stamp-design would turn into a blob :)


     Aren't they adorable!?? I'm sure you can guess the owl and pumpkin are for halloween...but the "B"?...it's for "Biddle Bits" :)

    Happy H-OWL-oween!
    All packaged up and ready to go!

    Step #6: Pour yourself a big ol' glass of milk and ENJOY!! Let me know how they taste :)

    For all you bakers (and store-bought cookie Connoisseurs out there), 
    What's your favorite type of cookie? Care to share the recipe?!

    Wednesday, October 10, 2012

    How to update an inherited sewing box


    Can you tell I'm on a roll right with spray-paint? Give me a can of Krylon and I'll paint ANYTHING!!

    I inherited this oldie, but goodie sewing box from my Grandma Adams. It's sentimental to me...she wasn't a seamstress, really, but it held the needles and thread she used to hem Grandpa's pants, along with the materials she used to make yo-yo circles for her homemade clown dolls for her grandchildren and great-grandchildren.


    Now that I have a dedicated sewing/craft desk (thanks, Honey!), this lovely leaf-motive box has been sitting out on display - However, it's not really my style. I knew I could give it new life, so figured out how to dismantle it and make it "mine"!


    Stuff you need:
    • screwdriver/putty knife you can wedge between the trim & the box
    • needle-nose pliers
    • primer
    • spray paint
    • your choice of new fabric
    • staple gun
    • hammer
    • scissors
    Instructions:

    Step #1: Check to see how your sewing box was assembled. 

    Step #2: Mine had staples holding the material together, so I used a putty knife/screwdriver to wedge between the trim and the box. 


    Wedging the putty knife in there should loosen the staples a bit, so you can then remove the staples by grabbing them with your needle-nose pliers:


    Continue with your putty knife and pliers all around the perimeter of the box, until the trim is completely off. You can throw away the staples you removed, but keep the piece of trim!


    This is what it will look like: (I removed the small piece of velcro after I took this picture - I decided that I didn't need velcro on the final project)


    Step #3: Take outside and spray paint with 1 coat of primer. When that dries, spray paint a 2nd coat. Don't worry about getting paint on the fabric...you'll cover that up anyways! Let primer dry completely.


    Step #4: Using your choice of spray paint, (I used Navy Blue Gloss from Krylon), spray the sewing box with a light coat of paint. Let dry, then spray a 2nd coat (and 3rd, if needed). Let dry completely ~ 2 hours, depending on the humidity. It's typically humid here in NC, so I let it dry overnight.


    Step #5: Cut a piece of fabric for the top of the sewing box. Mine is a simple cotton fabric remnant from another project. Make sure it hangs over the edge of the sewing box lid by about 1 inch on all sides.


    Step #6: Using your staple gun, staple your fabric along the sides of the box lid, pulling the sides taut as you go. My staples didn't go all the way in, so I used a hammer to make sure they laid flush against the lid:


    Here's how it should look after you staple it. Using scissors, trim any excess fabric on the sides of the lid.


    Step #7: Re-align your trim piece along the sides of the lid, and use your staple gun to re-staple it to the lid. Again, use a hammer to make sure the staples are in as far as they'll go (and you can't see them). If you can still see the staples, you could dab a bit of matching-color paint to mask them, or use a colored sharpie marker in the same color as your trim. OR, you could try to hot-glue the trim back on...didn't think of that until just now :)


    Step #8: You're done!! Enjoy your updated sewing box!!


    Quite a difference, don't you think?!