My sweet hubby went to the Raleigh Habitat for Humanity ReStore earlier this year, and brought home a trunk-load of various sized cabinet doors for $1-$2 each. I can't remember how we originally intended to use them (not as cabinet doors...), but as I was looking through our stash of wood scraps, an idea hit me. I could use one as a "large wood scrap" for a holiday sign I'd been wanting to make.
Sadly, I've *somehow* misplaced most of my "in-progress" pictures, so please forgive me as I describe the process, for the first time, with out many pictures!!
The previous owners of our home left several paint gallons in our garage - one color was Sherwin Williams "Poinsettia", which is about the reddest-red I've ever seen! It said "living room" on top of the never-opened lid, which means that I *think* they had intended to paint our living room Christmas red! (holy smokes...I'm glad they didn't...this paint is SO red!)
What you need for this project:
- cabinet door
- paint - your color choice - I chose red
- 1.5-2" paint brush
- Small paintbrush - like the kind you did "paint-by-number" with as a child
- white acrylic paint - or your color choice
- black sharpie market
- medium grit-sandpaper (optional - to give it a more rustic look)
- polyurethane (optional)
How-to instructions:
Step #1: Take a wet washcloth and (in my case) clean the garage-grime off the door, then wipe it dry. Paint the whole cabinet face and edges with the red paint. Let it dry, then paint a second coat. Let dry.
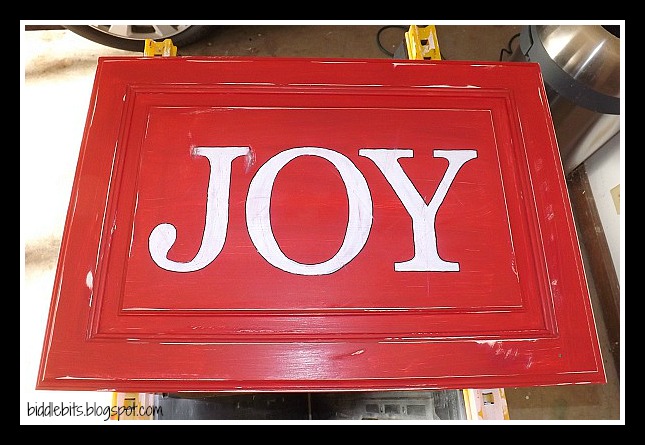
Step #2: While the paint is drying, decide what word you want to print on your sign. I chose "joy". In Microsoft Word, I typed JOY into a word doc (font = Cambria), then enlarged the font to 770. Each letter took up *most* of an 8.5x11" piece of paper. Print it out. (Note that if you're working with a smaller cabinet door, you'll need to adjust the size of your letters to make them fit).
Step #3: Using an Exacto knife (or scissors), cut out each letter.
Step #4: Make sure the red paint is dry, then lay your letters out on the cabinet door to make sure they fit. Making sure they're spaced evenly apart and centered, trace the letters onto the door using a pencil or pen.
Step #5: Using white acrylic paint and a small paint brush, begin outlining and filling in each letter, being careful to keep your edges as neat as possible. Let dry. Do a second coat of white paint. Let dry.
Step #6: Once the white paint is completely dry, take a black sharpie marker and outline your letters. This is optional, but gives a nice definition to your letters, and cleans up any not-so-perfect letters you may have.
Step #7: Taking medium-grit sandpaper (I used 120), rough up the edges of the cabinet door. I also chose to rough up the letters a little - to make it look more rustic and authentic. *Just be sure the paint is completely dry...otherwise the sandpaper will smudge the wet paint = not pretty. (I tried the orbital sander, as seen in the picture below - it was too powerful for the look I was going for, but if you want a *really* distressed look, try a similar sander!)
 |
| Using the orbital sander... |
 |
| Roughing up the letters... |
 |
| Look how rustic and charming it turned out! |
Step #8: You may choose to spray a coat of polyurethane as a finishing touch, especially if you want to display this outdoors. We're only displaying ours indoors, so I skipped the poly.
Step #9: Put your beautiful work on display! I think ours will live above our mantel this Christmas season.
Who's ready to make one??